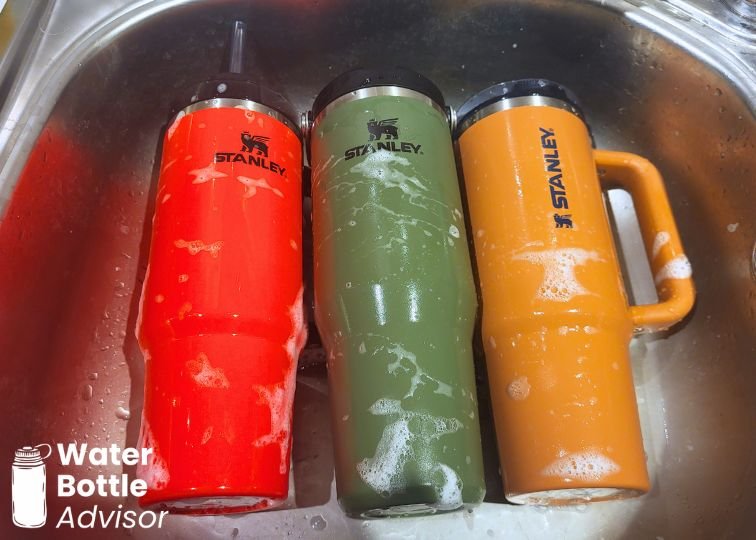
There are three main Stanley tumblers you’ll see most often right now: the Quencher, the ProTour, and the IceFlow.
The cups themselves are pretty easy to clean. They have a similar sturdy build, and warm water, dish soap, and a bottle brush usually do the job.
But the lids are where things get messy.
A lot of Stanley owners think they’re cleaning their tumblers properly, then later find mold, grime, or a bad smell hiding around the small parts.
Quencher tumblers come with FlowState lids, while ProTour and IceFlow models use flip straw lids. They look simple, but they need a bit more attention.
In this guide, I’ll show you how I clean my Stanley tumblers and lids so you can keep yours fresh and avoid replacing it just because it started to smell off.
Stanley Quencher
Let’s start with the main star of the Stanley lineup, even if it’s not my personal favorite: the Quencher.
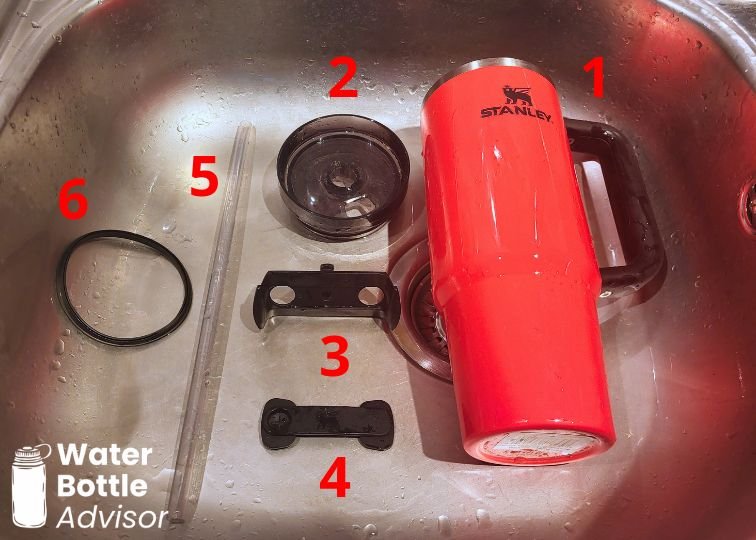
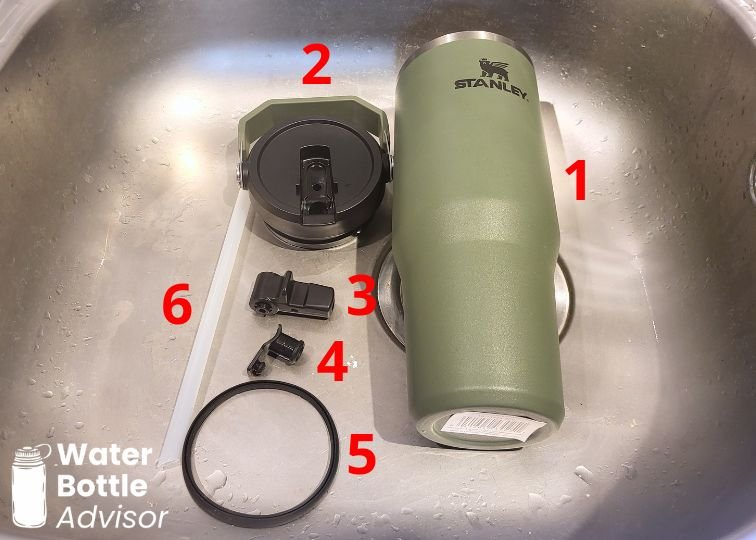
Many people don’t realize there are six separate parts that should be taken apart and cleaned if you want to keep the tumbler in good shape.
You don’t have to disassemble the whole thing every single day if you only use it for water. But if you drink coffee, juice, soda, smoothies, or anything sugary from your Quencher, I’d clean every part properly that same day. That’s where smells and grime usually start.
Here’s the quick cleaning routine:
Step #1: Take everything apart. You should end up with six pieces. Stanley includes instructions for this, but I’ll explain the process below too.
Step #2: Wash the tumbler with warm water, dish soap, and a sponge or bottle brush.
Step #3: Clean the silicone parts, including the gasket and the silicone seal on the tab.
Step #4: Wash the plastic parts, meaning the lid and the tab.
Step #5: Clean the straw with warm water, dish soap, and a long straw brush. The Quencher straw is pretty long, so a regular small brush may not cut it. If you don’t have one, cover one end of the straw with your finger, pour in some warm soapy water, cover the other end, and shake it for a few seconds.
Step #6: Rinse everything well so there’s no soap left behind.
Step #7: Let all parts dry fully before putting the tumbler back together. If you’re in a rush, use a paper towel. Trapped moisture is one of the easiest ways to bring back bad smells.
This whole cleaning routine takes me around 8 minutes, so I wouldn’t call the Quencher the easiest or fastest Stanley tumbler to clean.
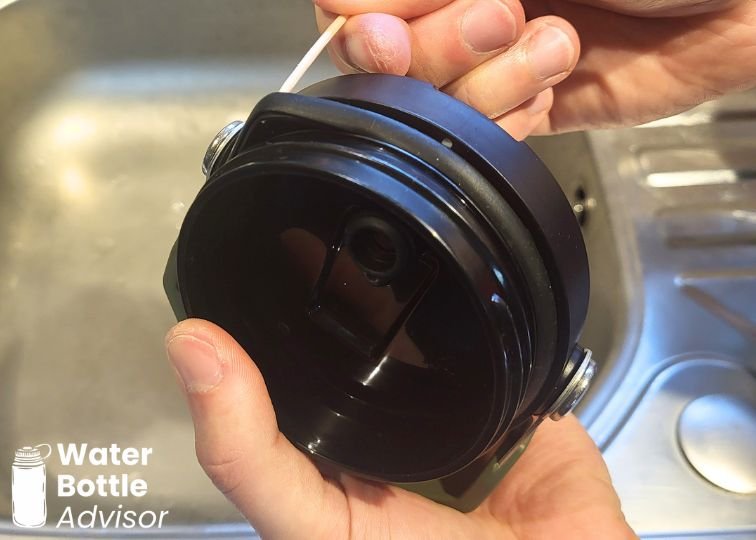
How to disassemble the FlowState lid
First, remove the tab. Flip the lid upside down, pinch the bottom part of the tab, and push it out once it’s squeezed as far as it can go.
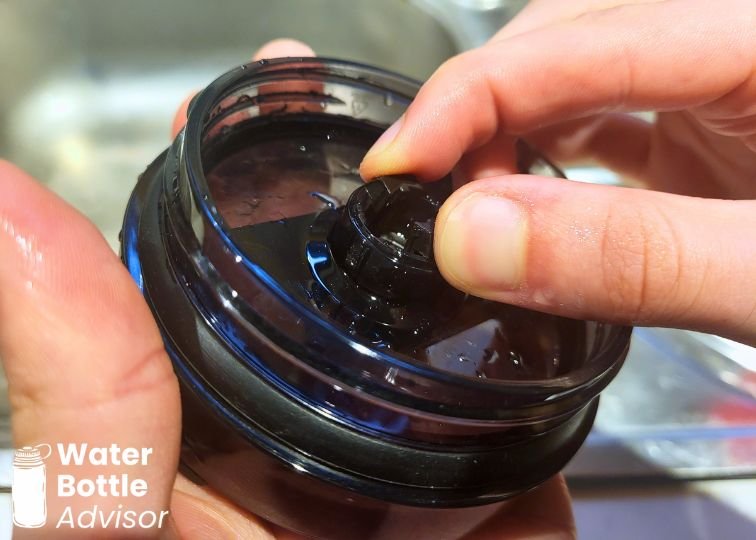
Then remove the silicone seal. Push it from the bottom through one of the holes. I find it easier to start from the hole where the silicone doesn’t have the straw opening. Once part of the seal comes loose, you can pull the rest out from the other holes.
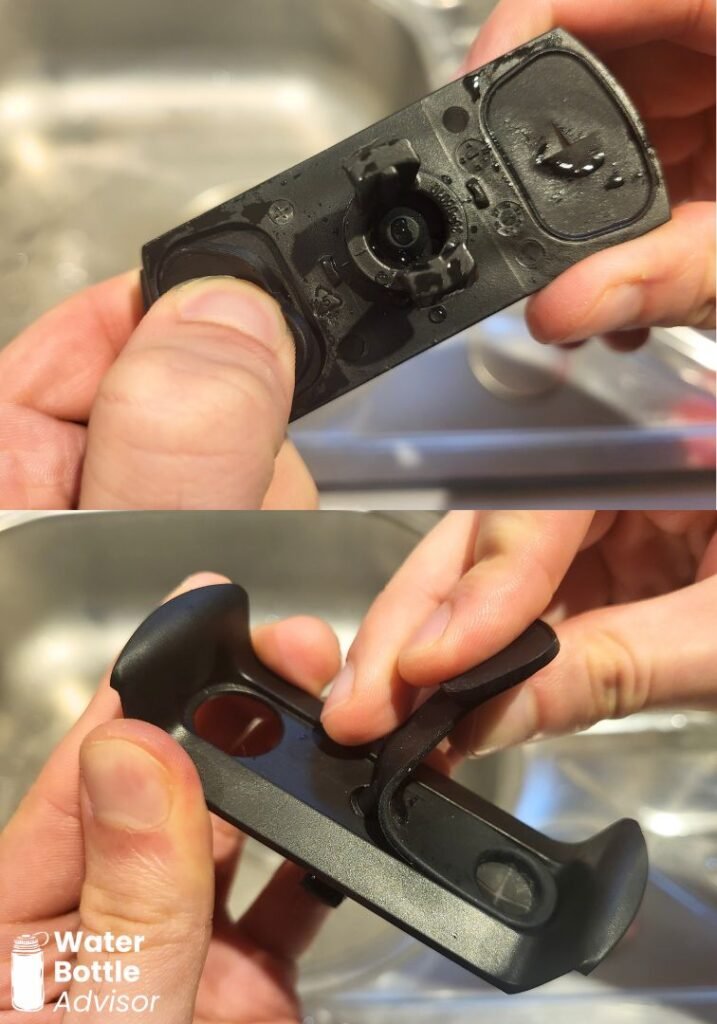
One important thing: remove the tab before taking out the silicone seal. I once tried doing it the other way around, and while it was technically possible, it was way more difficult than it needed to be.
How to put the lid back together
Putting everything back is the fiddly part.
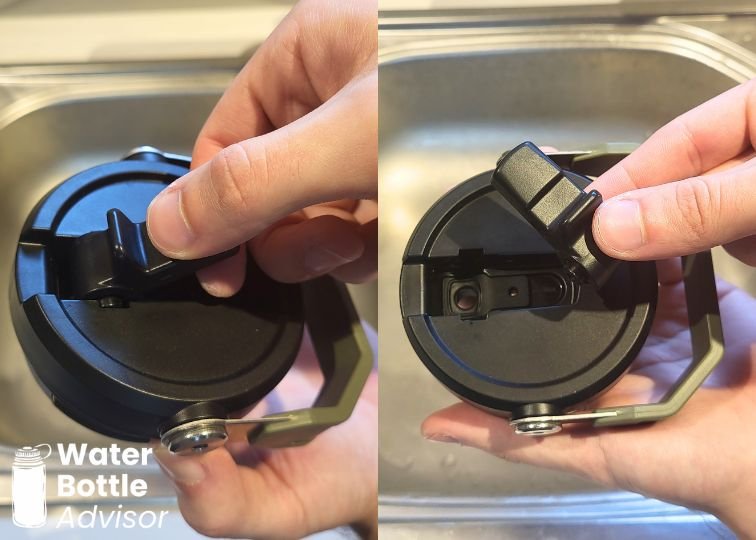
Start with the silicone seal. Push it in from the top. I usually turn it sideways and squeeze the end of the seal as much as possible so it fits through the hole. Once it’s in, make sure it snaps into place properly. Then repeat the same process on the other side.
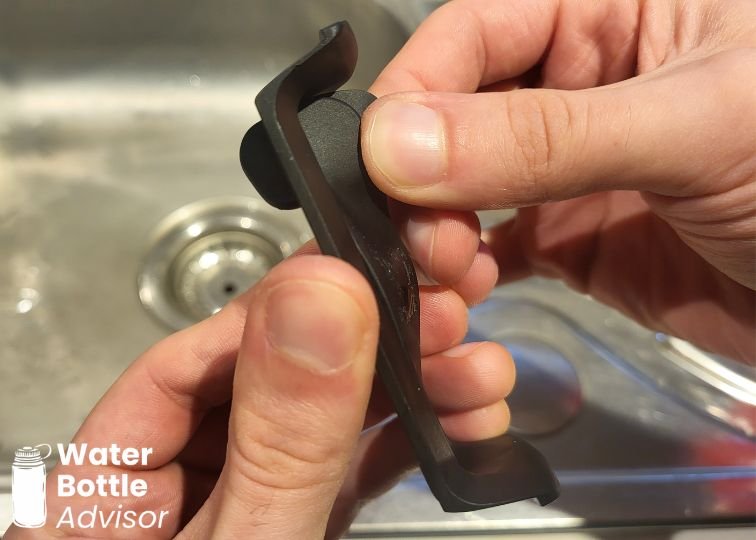
After that, put the tab back into the lid. Stanley says to simply “press” it in, but in my experience, that’s not enough. Place one bottom piece into the hole first, then pinch the second piece so it slides in too. Press it down until you hear it click.

It works, but it’s not the smoothest process. My fingers usually feel it a bit afterward!
If the written steps are a little hard to follow, the video below walks through the whole thing. And yes, I timed it: disassembling and reassembling the lid alone took me 2 minutes and 24 seconds, without any actual cleaning. For context, my easiest bottles to clean take less than 2 minutes to fully take apart, clean, and put back together spotless.
Stanley IceFlow & Stanley ProTour
The Stanley IceFlow and ProTour both use similar flip straw lids, so the cleaning process is almost the same for both.
At first, I thought there were only two removable parts: the lid and the straw. Then, a few months after buying them, I found out there are two more pieces hiding in there: the spout and the gasket underneath it.
If you’ve had anything sugary in your tumbler, it’s worth cleaning them.
To remove the spout, place it at about a 45-degree angle and pull firmly. And yes, it takes more force than you’d expect. It feels wrong the first time, but don’t panic. It’s designed to come out that way.
To put the spout back in, hold it at a 45-degree angle again and push it into the grooves until you hear it click.
The gasket on the threads can also be tricky to remove with just your fingers, so a toothpick or something similar helps. Just be careful not to damage the silicone.
Here’s the cleaning process for the IceFlow and ProTour models:
Step #1: Disassemble the lid. You should end up with six parts: the tumbler, lid, spout, straw, thread gasket, and the small gasket under the spout.
Step #2: Wash the tumbler with warm water, dish soap, and a sponge or bottle brush.
Step #3: Clean both gaskets with warm soapy water.
Step #4: Wash the lid and spout, paying attention to the small grooves where grime can sit.
Step #5: Clean the straw with a long straw brush, warm water, and dish soap. If you don’t have a straw brush, pour soapy water into the straw, cover both ends with your fingers, and shake it for a few seconds.
Step #6: Rinse every part well.
Step #7: Let everything dry fully before putting it back together. If you’re in a rush, use a paper towel.
Overall, the IceFlow and ProTour are easier and faster to clean than the Quencher. Still, there are more hidden parts than you might expect, so it’s worth taking a few extra minutes to do it properly.
Are Stanley Tumblers Dishwasher-Safe?
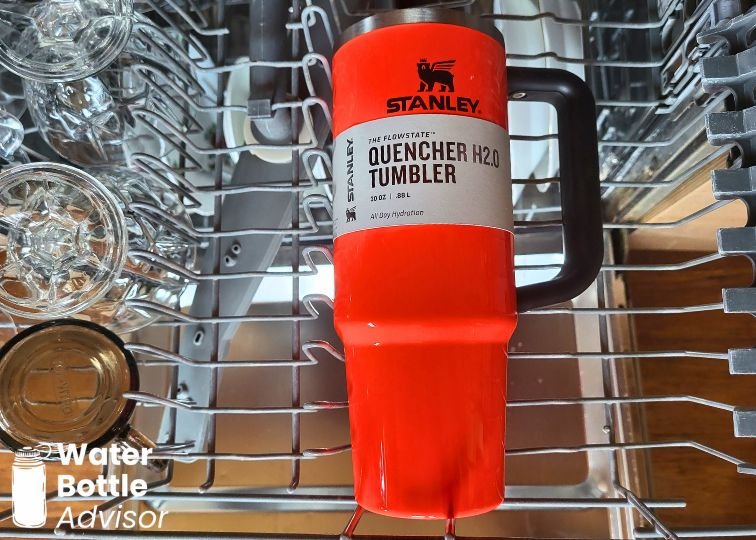
At this point, you might be thinking: can’t I just toss my Stanley in the dishwasher and call it a day?
Technically, yes. Stanley clearly says its tumblers are dishwasher-safe on the product pages and labels. But if you read the care instructions more closely, they also recommend hand washing to help preserve the finish.
And that matters. Most people don’t buy Stanley tumblers only because they hold ice well. The look is part of the appeal too. So if you care about keeping yours in good shape, I’d stick with hand washing most of the time. That’s what I do with my Stanleys and pretty much every other bottle I own.
That doesn’t mean the dishwasher is off-limits. I still use it sometimes when I can’t be bothered. I just wouldn’t make it my everyday routine.
One more thing: even if you use the dishwasher, don’t throw the lid in as one solid piece and hope for the best. Take it apart first, so the water can actually reach the small parts where grime and smells tend to hide.
How to Deep Clean Stanley Tumblers
It happens. You forget to clean your Stanley for a few days, maybe even a few weeks. Hopefully not months. Now you’re dealing with a smelly, expensive piece of drinkware that no longer feels so fun to use.
When that happens, a quick rinse with dish soap usually won’t cut it. You need a proper deep clean.
I find it best to clean the lid parts and the tumbler body separately because they usually have different problems.
So instead of treating the whole Stanley as one piece, split the job into two parts: deep clean the lid carefully, then deal with the inside of the tumbler. It takes a little more time, but it works much better.
Step-by-step: How to deep clean Stanley lid parts
- Take the lid apart
- Rinse each part with warm water. This helps remove loose residue before soaking.
- Wash with warm, soapy water. Use mild dish soap and scrub the lid surface, straw opening, drinking spout, and grooves.
- Soak the removable parts. Place the lid parts in a bowl with warm water and white vinegar. Use about 1 part vinegar to 1-2 parts water.
- Let them soak for 15–30 minutes. For stronger smells or visible buildup, you can soak them a little longer.
- Scrub the small areas. Use a straw brush, small bottle brush, toothbrush, or cotton swab to clean around seals, gaskets, straw holes, sliders, and hidden grooves.
- Rinse very thoroughly. Make sure no vinegar, soap, or loosened residue is left behind.
- Air-dry completely.
Step-by-step: How to deep clean the tumbler body
- Empty and rinse the tumbler. Use warm water to remove any leftover drink residue.
- Add baking soda. Sprinkle 1-2 tablespoons of baking soda into the tumbler.
- Fill with warm water. Add enough warm water to cover the stained or smelly areas.
- Let it soak for 30-60 minutes. This helps loosen odors, stains, and residue inside the cup.
- Scrub the inside with a bottle brush. Focus on the bottom, corners, and inner walls where coffee, tea, or smoothie residue can build up.
- Use a baking soda paste for stubborn stains. Mix baking soda with a small amount of water, apply it to stained areas, let it sit for 10–15 minutes, then scrub gently.
- Wash with dish soap. After the baking soda soak, clean the tumbler again with warm water and mild dish soap.
- Rinse thoroughly. Make sure no baking soda or soap residue remains.
- Air-dry with the lid off. Place the tumbler upside down or on its side so it can dry completely before storing.
Final Thoughts
As you can see, cleaning a Stanley isn’t just about washing the tumbler body and moving on.
Yes, Stanley offers a lifetime warranty on its products, but that won’t help much if your tumbler starts smelling bad because old coffee, juice, or smoothie residue has been sitting in the lid for weeks. That’s not really a product defect. That’s grime doing what grime does.
A quick daily clean goes a long way. It keeps your Stanley fresh, makes it nicer to use, and saves you from dealing with a much more annoying deep-cleaning session later.

Jeremiah Kowalski
Jeremiah Kowalski is a drinkware product researcher who has personally tested 50+ reusable water bottles, tumblers, mugs, and filtration systems from leading brands. He focuses on real-world performance, durability, and safety to help readers choose drinkware that actually fits their daily hydration needs.